Steps to Set Up a Printer on a Network
-
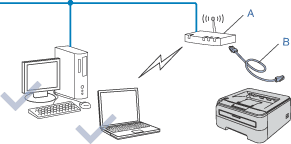
Connect the Printer to the Network
- Turn on the printer.
- Go to the settings > setup wizard on the control panel.
- Select your Wi-Fi network name (SSID).
- Enter your Wi-Fi password.
- Wait for the confirmation that the printer is connected.
- Plug an Ethernet cable from your router to the printer.
- The printer will automatically connect to the network.
-
Install Printer Drivers and Software
- Go to the printer website.
- Download the latest drivers for your printer model.
- Run the setup and follow on-screen instructions.
-
Add the Printer to Your Computer
- Go to Settings > Devices > Printers & scanners.
- Click Add a printer or scanner.
- Select your printer from the list and click Add device.
- Set as a default printer.
- Go to System Settings > Printers & Scanners.
- Click the + button to add a printer.
- Select your network printer and click Add.
-
Print a Test Page
- Open any document and click Print.
- Select the network printer from the list.
- Print a test page to verify the setup is complete.
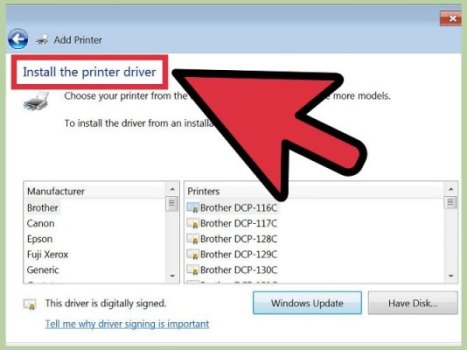
How to Install Printer Drivers – Step-by-Step
For Windows OS (Windows 10/11)
- Plug in your printer via USB or connect it to your Wi-Fi network.
- Turn on the printer.
- Now go to the website of your printer’s.
- Search for your printer model.
- Choose your Windows version (e.g., Windows 10 64-bit).
- Download the recommended driver package.
- Open the downloaded file (usually .exe).
- Follow the on-screen installation instructions.
- Choose the connection type (USB/Wireless) when prompted.
- The installer will detect your printer and finish setup.
- If needed, restart your computer.
- Print a test page to confirm everything is working.
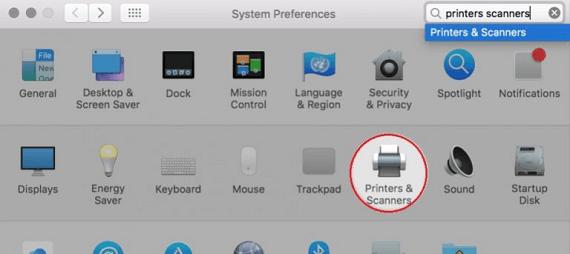
For macOS (macOS Ventura, Monterey, Big Sur, etc.)
- Connect your printer via USB or join it to your Wi-Fi network.
- Turn on the printer.
- Visit the website of your printer.
- Search for your printer model.
- Select your macOS version.
- Download the driver or printer utility.
- Note: macOS may also auto-detect and install the driver when the printer is connected.
- Now go to System Settings > Printers & Scanners (or System Preferences on older macOS).
- Click the “+” button.
- Select your printer from the list.
- Click Add — macOS will install the necessary drivers.
- Print a test page to confirm everything is working.
Troubleshooting Steps for Common Printer Issues
-
Printer Is Not Printing
- Check if the printer is turned on and connected (via USB or Wi-Fi).
- Make sure there’s paper in the tray and ink/toner is not empty.
- Verify your printer is set as the default:
- Windows: Go to Settings > Devices > Printers & Scanners → Right-click your printer → Set as default.
- Mac: Go to System Settings > Printers & Scanners → Select your printer.
- Restart the printer and computer.
- Cancel all print jobs and try again.
- Reinstall or update the printer driver.
-
Printer Is Offline
- Check the printer’s Wi-Fi or network connection.
- If using USB, ensure the cable is properly plugged in.
- Restart your Wi-Fi router and printer.
-
Paper Jam
- Turn off the printer and unplug it.
- Gently remove any stuck paper from the input and output trays.
- Open the back or inside access panels and check for jammed sheets.
- Avoid using torn, folded, or low-quality paper.
-
Poor Print Quality (Faded, Streaky, or Blurry Prints)
- Check ink or toner levels; replace if low.
- Clean the printhead using the printer’s utility software.
- Make sure you are using the correct paper type setting.
- Run a print head alignment from the printer menu or software.
-
Printer Driver Issues
- Uninstall the current driver:
- Windows: Control Panel > Programs > Uninstall a program.
- Mac: Remove from Printers & Scanners and delete associated files.
- Download and install the latest driver from the printer website.
-
Printer Not Found on Network
- Ensure the printer is connected to the same Wi-Fi network as your computer.
- Restart both the printer and router.
- Use the Wireless Setup Wizard on the printer to reconnect to Wi-Fi.
- Check your firewall or antivirus settings – they may block network access.
-
Slow Printing
- Switch to draft mode in print settings for faster prints.
- Check for large image files or complex formatting.
- Clear the print queue.
- Update your printer’s firmware.
-
Mobile Device Can’t Find Printer
- Ensure the mobile device and printer are on the same network.
- Make sure mobile printing features like AirPrint, Google Cloud Print, or the are enabled.
- Restart the mobile device and the printer.